
In this tutorial we will see how to develop a simple approach to number masking, allowing people to be called without having to disclose their real phone numbers.
Contents
What is number masking?
Number masking is a technique that allows an individual to use a temporary phone number to communicate with another party without disclosing his real phone number. Number masking answers many different real business use cases across industry sectors where communicating a real personal or even business phone number could become problematic to safeguard this person’s privacy or work effectiveness.
Think about drivers for ride services, food delivery, truck transports in the logistics sector, employees working in the back office on customer cases, or caregivers and nurses in the home care sector: each of them may have valid reasons not to disclose their personal phone number. They need to guarantee a clear cut between their private and professional lives. Organizations and online platforms working with these people may as well find in number masking a way to avoid off-platform transactions (such as a customer calling a driver directly to avoid paying fees to the driver’s platform).
There are multiple approaches to number masking, such as one way masking (1 party is contacted thru a masked number) or two way masking (2 parties can call each other over temporary numbers assigned to each of them). And there are several ways to implement number masking with Proximus FlexIO, using the Visual Designer or using APIs.
A number masking scenario for field technicians
Let’s suppose a utility company has technicians visiting customers for installation and repair operations. Technicians use a work force management solution (WFM) on their smartphone or tablet, showing the list of all planned interventions for the day. In the WFM solution, a technician can press a button next to each intervention record to trigger a phone call to that customer (1). Our number masking solution steps in and first calls the technician (2). Once the technician has picked up the phone, our number masking solution makes a call to the customer (3). When the customer picks up the phone, both technician and customer are put together in call (4).
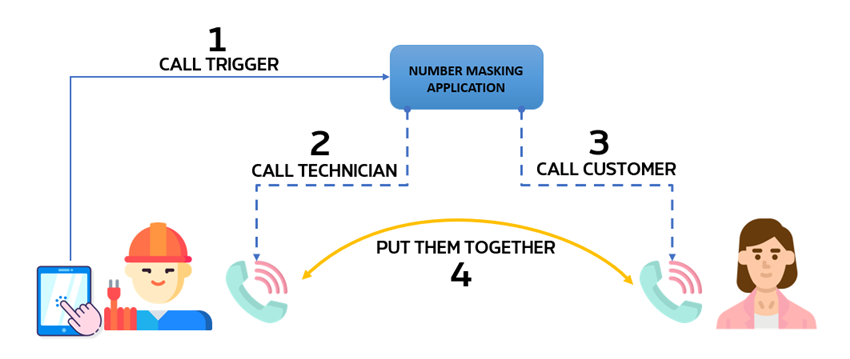
To both technician and customer, the call will appear as coming from the temporary number used by the number masking solution.
In this tutorial, we will see how we can develop such system using the Visual Designer of Proximus FlexIO.
Scenario implementation
Number pool
To get started with number masking, you should have at least one phone number reserved and available on the FlexIO platform. You could also provision several numbers to have the freedom to rotate usage, like using a different number for each masked call.
Once logged on API Solutions, open a new browser tab to the Proximus FlexIO Number Management microsite and register a new phone number to your account.
Using the visual designer
If you have never used FlexIO and the Visual Designer before, it’s maybe best to start first with this tutorial. Come back here once you’re done.
Go to the Proximus FlexIO console and create a new blank Visual Designer Application. We’ll call this application “numberMasking“. We’ll have 2 actions in this application:
- a Say action, just to let the technician know the application is now going to call his customer
- a Dial action to a Number where this number is defined as $customernumber – this dollar sign means customernumber is a variable, as the customer number will be different for each call
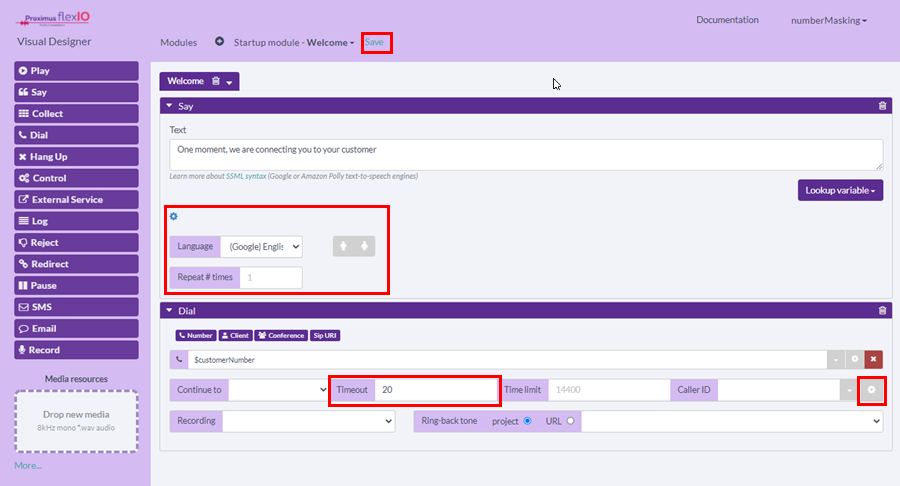
Please note the various setting cogwheels in the interface that we clicked to choose the language of our Say action and well as to define that we will only try to call the customer for 20 seconds before giving up. Don’t forget to save your work once this is all done.
Creating a web trigger
Now that the application is created, we need to know how to trigger it easily. The objective is to have a simple trigger that takes in the number from which we will call (ie the masked number), the phone number of the technician and the phone number of the customer. By using this trigger, we launch the whole call sequence.
While still being in the Visual Designer, click on the top right menu and select first Account Settings to verify that your Proximus FlexIO credentials are correctly set.
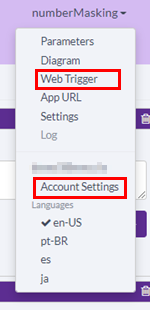
Select again the top right menu and click on Web trigger. Enable the trigger, set an application specific token (a password), copy the URL then save and close the Web trigger setting. The password token allows to securely share our web trigger URL without having to disclose our complete credentials on Proximus FlexIO.
Paste the copied URL in an empty text file (such as using Notepad), and replace “mysecret” at the end of the URL by your application specific token or password.
Save your application. You may now close that Visual Designer window.
Editing the web trigger
You will need to change a bit the URL you copied in the previous step to make it usable to trigger the masked call scenario. Go back to the text editor where you pasted your URL and:
- change “to=+1231231231” to “to=%2B32xxxxxxxxx” where 32xxxxxxxxx is the phone number of the technician
- change “from=12345” to “from=%2B32aaaaaaaaa” where 32aaaaaaaaa is the phone number that you have reserved on the FlexIO platform for this application. This is the callerID that will be shown to both the technician and the customer
- add “&customernumber=%2B32bbbbbbbbb” at the end of the URL, where 32bbbbbbbbb is the phone number of the customer
Your URL should look like this (we used “x” to mask sensitive information so your own content should be real):
https://proximusflexio.enco.io:443/visual-designer/services/apps/APxxxxxxxxxxxxxx/start?from=%2B32xxxxxxxx&to=%2B32xxxxxxxxx&token=somepassword&customernumber=%2B32xxxxxxxxx
Testing the scenario
To launch the scenario, just copy your customized URL in a new browser tab and hit enter. Congratulations, your first masked number scenario is now fully working!
Integrating the number masking application in a WFM system
This is obviously a task for developers or application engineers, but all it takes is to use the URL you just built and have your calling button trigger a HTTP GET request to this URL. Obviously the values after “to=” and “customernumber=” will not be fixed values anymore but variables that are resolved at each execution request.
Call usage and reports
You may now want to understand if and how this system is used by your technicians and get a bit of statistics on their calls. It is important that field technicians communicate regularly with their customers to let them know about their expected arrival time and warn them about delays. Good communication always increases the level of customer satisfaction!
Go to the Proximus FlexIO console and click on the Logs link on the top menu. From here, you have access to all your call records and can filter by originating number (our “from” number), destination numbers, dates etc. All of these informations are also available via API so developers can retrieve usage data on a daily basis and integrate that data in your own reporting systems.
Advanced number masking
Proximus FlexIO also comes with advanced number masking APIs. These specific APIs makes it easier for you to manage masked number sessions between 2 participants in such a way that you don’t need to take care of most of underlying technical details. These advanced APIs are more suitable for bi-directional number masking use cases, such as the ability for a taxi driver and a customer to contact each other once a ride is reserved, or a back office employee and a customer to contact each other without compromising the direct phone number of that employee.
Among other, the APIs let you:
- manage your own masked number pool
- create on the spot bi-directional number masking sessions and control their status and duration (such as the duration of a taxi ride)
- define what happens when someone tries to contact a masked number once the session as expired (such as a customer having forgotten valuable goods in the taxi and trying to contact the driver)
- automatically ban callers from number masking sessions
- access integrated reporting (API and user interface) to understand how and when interactions are being used
If you are interested to know more and get access to our advanced number masking APIs, don’t hesitate to reach out to us.